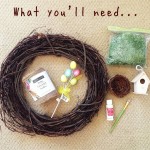
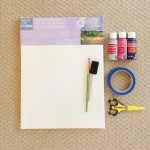
DIY

While looking through Pinterest last night I came across this behavior chart.  It really stood out to me as something that I thought could work well with Nathan.  Lately I have been trying to come up with a solution for his constant request for things….Mommy, after school can we go to the mall and get a Lego Police Station?  Mommy, after we go to your store we can go to my store and I’ll get ice cream ok?  Mommy, can we go to Toys R Us today and get a giant Nerf blaster?  So and So has a Nerf gun, I want one too.

I understand this is pretty typical behavior for a 3.5 year old, but it drives me nuts how obsessive he is about.  It is literally what he  talks about ALL.DAY.LONG.  Since he doesn’t really understand the concept of time (Nathan, when it’s your birthday we can put this on your wishlist), I have really been struggling with explaining to him that he can’t have everything he wants.  Or if it is something that I think he deserves, I want him to know we are proud of him and that eventually he can be rewarded for his good behavior.

Then the desperation kicks in…and I lose sight of the difference between rewarding good behavior and bribing him.  He starts acting up, he fights me to get in his car seat, he won’t listen to me at the grocery store and I feel myself getting flustered….and then I blurt it out “Nathan, if you listen to Mommy we will go get you a Lego Police Station!!!!”….Nooooooooooooo, why in the world did I just say that?  Talk about being inconsistent and sending the wrong message to him.  I completely panic and say the first thing that I know will get his attention.  I don’t even realize I’m doing it, but then I will hear Greg do the same thing and THEN I realize just how wrong it sounds.

That is why this chart stood out to me.  In addition to the fun of the chart itself, you also earn “pom-pom points” along the way.  Once he has enough pom-poms to fill his jar THEN we can go get a special reward.  This doesn’t necessarily have to be a toy or a treat either if you aren’t into that, it could be a trip to the zoo, a movie date with Mommy, a baseball game with Daddy….whatever you think is great incentive that will keep your child interested.

Also, the “5 Minutes” and “10 Minutes” can be changed to other words if time-outs aren’t your thing or don’t work for your child.  We call them “taking breaks”.  They aren’t forceful or meant to make him upset, he just gets to spend some quiet time in his room to catch his breath and calm down.

I’m pretty optimistic that this chart is going to be very helpful in our household.  It will keep me and Greg on the same page, it should hopefully keep Nathan interested, and I love the visual nature of SEEING the cause and effect of your actions.  The pom-poms in the jar also give him a sense of time which really helps us avoid saying “someday”, “when you get bigger”, “maybe for your birthday” etc etc.

He was AWESOME with it today.  Asking if he could help me make dinner, if there was anything Shane needed, if I wanted to see him eat all his food….and the real kicker, he went right upstairs and asked to take a nap so “the lizard could climb up the chart”.  I couldn’t believe what I was seeing!  I will keep you posted on the progress we make with it.

If you wanted detailed instructions on how to make one you can find them here.

I made ours on foam core board instead of poster board like the above blogger used.  I also didn’t make ours hanging, I liked having the firmer board so I can move it around to different rooms if I needed to.  We will probably adjust the “rules” a little bit to cater to our household, but the ones in the link are great and you can just print those out and keep with your chart.

I found the large clothespin at the $1 checkout line at Michael’s, and glued on the little wooden lizard that I also found at Michael’s.  You could use anything on your clip.  And if you have more than one child they can each get their own unique clip and use the same board.  So far the lizard worked out great because Nathan loves thinking that it’s climbing up and down the wall for him.

There seem to be a million and one ideas and opinions on how to raise a well-behaved child.  What works for one may or may not work for another.  I know my sister and I came from completely different molds, so I’m sure my parents just had to adjust what they did along the way and roll with the punches.  I know consistency is key, but I also think trial and error comes into play quite often too.  So….we are going to give this one a try.  It’s in line with what we have been doing but it’s a much more organized version of it.  I’m actually hoping it helps keep my behavior in check just as much as it does Nathan’s.  I’ll make sure to update how it goes!  Wish us luck!

Behavior Chart behavior chart 2 behavior chart 3

DISCLAIMER: IF YOU ARE MIMA OR NANA STOP READING NOW  :)

Yesterday the boys and I worked on part of the gifts we are going to send out for Mother’s Day in a few weeks.  My mom and Greg’s mom live across the country from us so we know they love anything tangible that is a reminder of the boys.  What’s better than seeing their little hand prints on something they made and knowing they can carry them around anywhere they go?

These totes are great on their own, or you can use them as a gift bag and fill with other goodies for Mother’s Day….photobooks, a frame, gardening tools, candles, jewelry, bath and body products, baked goods etc.  Here are some simple instructions for how we made ours.

What you’ll need:

-Canvas tote (Micheal’s had a huge selection ranging from $2-$10 based on size & quality-these are just the $2 ones)

-Fabric paint (green for grass/stems, black for the writing, and whatever colors you would like for hand print flowers)

-Paint brushes

-Pencil (to sketch out placement of writing)

-Paper grocery bag or cardboard

tote1

I used a paper grocery bag and slipped it right into the canvas bag.  It fit inside the tote perfectly so the paint wouldn’t seep through to the other side of the bag.  Next place the bag on a hard surface and paint on the grass and where you want the flower stems.  I did two flowers so there was one for each boys’ hands.  If your child is old enough they can definitely help with painting this part.

tote2

Once the green paint dries it’s time to have your children come help with their hand prints.  Nathan liked squirting out the paint on a paper plate and rubbing his hands all around in it.  This didn’t work for Shane (complete mess), so I suggest just applying paint directly on your child’s hand if they are younger.  Wait for their hand prints to dry then go back in and touch up the leaves & stems if you need to.

tote3

After the flower hand prints dry you can add any writing you would like.  I went in with a pencil and sketched in where I wanted the lettering to go, then went over it with black paint.  Let the paint dry completely and then remove the paper bag.  Fill with their favorite things or give it to them as is.  Hope you give it a try….Happy crafting friends!

tote4

We celebrated yesterday with friends, family and neighbors!  I think I tried every version of corned beef and cabbage known to man, and had my first Irish Car-bomb since college!  This mama still has it (not really, not really at all!).

I made this easy, fairly healthy, and festive rainbow fruit platter!  Within minutes it was attacked by all the kids, and I was happy to see they went for the fruit before the “clouds” and “gold”.

I used strawberries, Cuties, pineapple, kiwi and blackberries.  You could definitely use cantaloupe, honeydew, green or purple grapes, blueberries, and mango as well.  The marshmallows were clouds but whip cream could also be fun, and I used Rolos as the pot of gold!

I hope you all have a lucky and SAFE St. Patty’s Day weekend!

fruit rainbow

If there is anything you will come to learn about me it’s that I am wreath obsessed.  I have them hanging all over our house, and I will change up our front door with each passing holiday and season.  While I could go crazy and transition my Valentine’s Day wreath into a St. Patty’s Day one and then an Easter wreath…I’ve decided to keep things simple and make one I can have up for all of Spring.  See how easy I made that for you?  And in the spirit of saving time and money I will go ahead and say this is one of the simplest ones I have made in both effort and supplies needed.  It also just so happened to turn out to be one of my favorites too!

All the supplies I used were from Michael’s. You will need:

1 large twine wreath (I believe this is a 16″)- $5

1 bag of Spanish moss- $4

1 large roll of burlap- $6

1 wooden birdhouse- $1

1 branch of Easter eggs- $1 (you can use whatever kind of egg you like.  I just picked these for their size and because they were the least expensive)

1 birds nest- $2

1 small bottle off white acrylic paint- $.50

Of course I used some coupons, and took 50% off that burlap roll.  I ended up spending less than $15 for everything.  You will also need a hot glue gun, glue sticks, scissors and a paint brush.

image (1) copy

I started with painting the bird house and 3 of the eggs in the off-white paint.  You can get creative here with color or you can go the more simple route like I did.  I also cut off the rope from the bird house and painted over where it was originally connected.

image (2) copy

Then I made a huge mess and started glue gunning on the moss.  I would add a pretty good amount of glue and add moss in about 6″ sections.  1 bag will stretch nicely across this size wreath.  Use the whole bag and shape it when you are finished, filling in some patches you may have missed.

image (3) copy

I then used my glue gun to attach the eggs inside the birds nest, and then attached both the nest and birdhouse to the wreath with the glue. You could also use wire to attach these items, that way you can take them off if you would like and add other items with the changing of holidays.

image (4) copy

Then take your burlap roll and cut a really long piece that you can trim after you are done according to the length you want to hang it.  I cut about a 9′ piece.  String the burlap through the wreath and pull it right to the center so the wreath is dangling from the middle point of your burlap ribbon.  Hold the burlap on both ends and tie a knot about 12″ up from the top of the wreath.  This is where you make a bow and pull the loops out as big as you would like them.  Fluff them out a little and shape them to the size you would like.  Let the additional burlap hang down and trim the ends so they are even.  Then cut again at an angle to give it a more finished look.

image (5) copy

Hang on your door with a wreath hanger from the point of the bow’s knot.  This will make sure it is securely attached to your door and at a strong point on the wreath.  Stand back and enjoy your beautiful new wreath that took about $15 worth of materials and about 15 minutes of your time!  Happy crafting and bring on that Spring weather!

image (6) copy

There is nothing that makes Nathan more proud than showing off his artwork, especially pieces that we hang on the fridge or the walls.  The only problem is he comes home with piles of art every week from preschool and I can’t possible find a place to hang it all.  I have been using the app called Artkive via my iPhone, and I totally love it.  You can take photos of their art, save it to the app with the details of when it was created, and even have a book printed straight from the app.  I keep a few of our favorite pieces he has done and unfortunately the rest get to say hello to the recycling bin.  The Artkive app has made me get over the guilt of throwing away some of his creations.

I thought it would be fun to get Nathan involved in making a permanent piece of art for one of our rooms.  Something he can see everyday that would make him shout “that’s my painting…I did that”!  And let’s be honest here…..something that mommy can look at everyday too and think, “hey that actually looks pretty cool!”.

So here is a simple DIY painting we did together.  We already had most of the materials around the house, and just went out and got a canvas at Micheal’s for 50% off.  You have to love a piece of art that ends up costing less than $5 and was great, messy, fun for your toddler.

Here is what you will need:

image (1)A canvas size of your choice, painters tape or masking tape, acrylic paints that “match” the room your art is going in, scissors, and some brushes.  Something that is not pictured that we ended up using was a regular household sponge.  I cut it into pieces and it was easy for him to dab paint all over the canvas in a fun way.

The next series of photos is where Mommy comes in to help.  All I had to do was tape off the pattern I wanted and the rest was up to him.  I did a simple chevron pattern.  You could do stripes, and random pattern, or even use sticky letters and write out a quote or their name.  You just want to mask off whatever you want to stay white.  When doing anything chevron I like to start with a centered “W” in the middle.  This way you can continue the pattern easily and know everything is going to line up when you are done.

image (2) image (3) image (4)

When you are done just hand over the canvas to your kiddo and let them create their magic.  I think the next time we do this I will quickly use white spray paint and go over the top of the tape to “prime” the canvas and prevent some of the paint bleeding under the tape.  It’s not necessary but I think you will get cleaner lines, and also your child will have a totally blank canvas.

image (5) image (6)

Once the paint is dry you can have them help you take off the tape to reveal the pattern.  Nathan thought this part was extra fun!  We had a great time making this together and both love how it turned out.  Happy crafting friends!

image (7)

Holidays are my favorite excuse for getting crafty and adding some festive DIY projects to our home decor.  With February a day away, I thought it would be fun to share some of the Valentine’s Day crafts I have completed.  I think I have hit my quota for all things pink and glittery this past month, but that’s what makes this one of my favorite holidays to get festive with!  Moving forward I will try adding some of my favorite projects to my blog with the addition of some simple DIY tutorials.  I hope you enjoy them!  Here’s to spreading some love in month of February!! xo

wreath mantle living room heart hand


Hey Lauren Rene © 2013. All Rights Reserved.